


Can’t Keep Up? Step-by-Step Easy Configuration Guide for S/MIME in Office 365


Following Microsoft’s encryption expansion strategy, Office 365 has now Message Encryption. This allows you to send encrypted email to anyone and protect information. Under this, customers will have S/MIME (Secure/Multipurpose Internet Mail Extensions) support across Outlook, Exchange ActiveSync clients and Outlook Web App (OWA).
WHAT IS SECURE/MULTIPURPOSE INTERNET MAIL EXTENSIONS
These days the buzz is hovering around S/MIME. People in the industry are still unaware about this latest capability of Microsoft. Thus, it is a standard for public key encryption and digital signing of MIME data.
BENEFITS OF S/MIME TO USER
- Encrypt an email.
- Digitally sign an email.
- Provide cryptographic security services such as message integrity, authentication and non-repudiation of origin.
- Enhanced privacy and data security for electronic messaging.
- Enables the end user to compose, encrypt, decrypt, read and digitally sign emails between users of an organization or two different organizations.
Below find easily understandable configuration steps which you need to follow to configure S/MIME for Exchange Online Only and Exchange Hybrid.
CONFIGURING S/MIME IN EXCHANGE ONLINE
In Exchange Online, all users are hosted on cloud and there is no on-premise Exchange organization.
REQUIREMENTS FOR CONFIGURATION
- .SST FILE: This file consists of all the root and intermediate certificates which are used while validating S/MIME message in Office 365. You can create the .SST file from the certificate store (steps are mentioned below).
- End User’s Certificate: This certificate is used for signing and encrypting the message issued from Certificate Authorities
CONFIGURATION PROCESS
Before enlisting the steps, please note that only SST will be used for S/MIME certificate validation in Exchange Online.
1. Create the .SST file for the Trusted Root or Intermediate CA: To export .SST file, you can either use PowerShell cmdlets or Certificate MMC. Below find the Certificate console process which is used for exporting .SST –
- Open certmgr.msc snap-in
- Expand Trusted Root Certificate Authorities
- Click Certificates
- Select CA Certificates which issues the certificates to end users for S/MIME
- Right click > All Tasks > Export
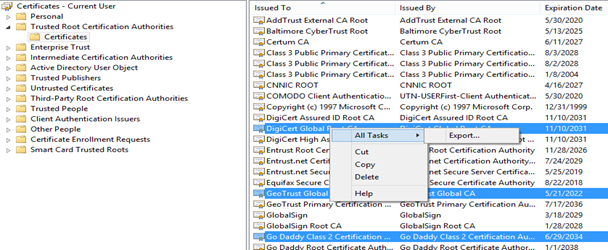
Please Note: There may be some intermediate CA’s as well. You can move all of these to Trust Root CA folder and export all in one .SST file.
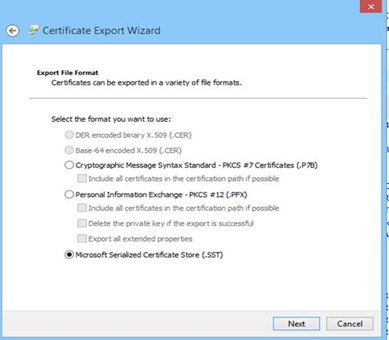
2. Once you have exported .SST file –
- Select Microsoft Serialized Certificate Store
- Click Next
- Save the SST file
3. Upload .SST to Office 365 Server: Update SST on Office 365 Exchange server by executing the following commands using remote PowerShell.
$sst = Get-Content <sst file copied from the box>.sst -Encoding Byte
(Example: $sst = Get-Content TenantRoot.sst -Encoding Byte)
Set-SmimeConfig -SMIMECertificateIssuingCA $sst

4. Publish: You need to publish user’s certificate to Exchange Online Global Address List (GAL) using Outlook. If this is not published, users will not be able to exchange S/MIME encrypted messages.
Please Note: To publish this certificate, user need to have the certificate installed on their local machine.
- Click Options on the File menu in Outlook 2013
- On the Outlook Options window, click Trust Center > Trust Center Settings > Email Security
- In the Trust Center Window, click Settings and choose the certificate issued by CA.
- In the Change Security Settings window, type any Security Settings Name and choose Signing and Encryption Certificate.
- Select the appropriate certificate assigned in previous steps and leave the Algorithm Default and click OK.
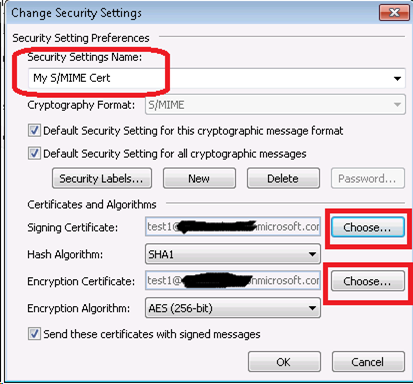
- As soon as you select the information, you will notice that the Default Setting is populated with Security Settings Name.
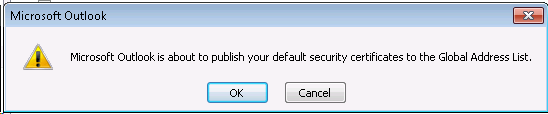
- Click the Publish to GAL button.
- Publish this certificate to GAL, click OK.
5. Confirm that the Certificate is Published in Azure Active Directory (AAD):
- Connect to Exchange Online using remote PowerShell
- Run the following command and ensure that the UserSMimeCertificate attribute is populated with the certificate information. If not, return to Step 4.
Get-Mailbox <user> | FL or FT *user*

6. The Final Step: As soon as you get the information that the end user has the certificate on their machine ( Check under Certificates > Personal store) and published in AAD, users can use Outlook, OWA or EAS to send or receive S/MIME messages.
Please Note: Make sure you check S/MIME Supported Clients section below before exchanging S/MIME messages.
CONFIGURATION S/MIME IN EXCHANGE HYBRID
In Exchange Hybrid topology, there will be certain mailboxes which will be homed on-premises whereas others on online. Users same the same e-mail address space.
REQUIREMENTS
1. Public Key Infrastructure (PKI): You can use Active Directory Certificate Services to issue certificates to end users.
2. SST File: Tenant admins will have to configure their tenant in O365 with signing certificates issuing CA & Intermediate certs information. They will also have to produce a SST file which would consist of collection of certificates. Later on, these are to be imported to O365 to validate S/MIME.
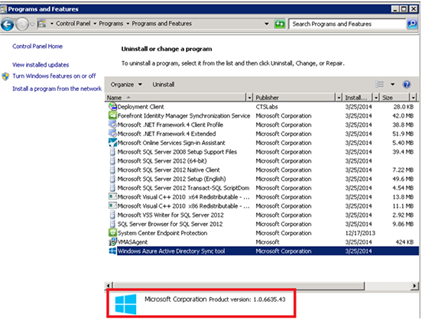
3. DirSync: You need DirSync tool (version 6593.0012 or higher). This helps in synchronizing Active Directory user object to the Azure AD such that cloud users can also see the certificate information of recipients while performing S/MIME operation. To verify DirSync version, follow the enlisted steps –
- Open Control Panel
- Click Programs
- Click Programs and Features
- Click Windows Azure Active Directory Sync tool
Check the version as the screenshot below:
CONFIGURATION PROCESS
1. Public Key Infrastructure (PKI): Before proceeding, it is mandatory to see that users in your organization must have certificates issued for digitally signing and encryption process. You may choose from either of the two – either you can install Certificate Authority On-premise to issue certificates to end users or have third party certificates issued to them. There are two attributes in a user object where certificate information is stored namely –
- User Certificate: It is populated automatically in on-premise deployment with a Windows root CA. It is populated at a time when the user enrolls for a user certificate. You can do this either manually for each user or an administrator can set a GPO to automatically enroll all users.
- UserSMimeCertificate: When an Outlook client publishes a certificate to GAL, these certificates are stored in userSMimeCertificate attribute.
2. Create the .SST file for the Trusted Root or Intermediate CA: To export .SST file, you can either use PowerShell cmdlets or Certificate MMC. Below find the Certificate console process which is used for exporting .SST –
- Open certmgr.msc snap-in
- Expand Trusted Root Certificate Authorities
- Click Certificates
- Select CA Certificates which issues the certificates to end users for S/MIME
- Right click > All Tasks > Export

Please Note: There may be some intermediate CA’s as well. You can move all of these to Trust Root CA folder and export all in one .SST file.
3. Once you have exported .SST file –
- Select Microsoft Serialized Certificate Store
- Click Next
- Save the SST file

4. Upload .SST to Office 365 Server: Update SST on Office 365 Exchange server by executing the following commands using remote PowerShell.
$sst = Get-Content <sst file copied from the box>.sst -Encoding Byte
(Example: $sst = Get-Content TenantRoot.sst -Encoding Byte)
Set-SmimeConfig -SMIMECertificateIssuingCA $sst
5. Publish: You need to publish user’s certificate to Exchange Online Global Address List (GAL) using Outlook. If this is not published, users will not be able to exchange S/MIME encrypted messages.
Please Note: To publish this certificate, user need to have the certificate installed on their local machine.
- Click Options on the File menu in Outlook 2013
- On the Outlook Options window, click Trust Center > Trust Center Settings > Email Security
- In the Trust Center Window, click Settings and choose the certificate issued by CA.
- In the Change Security Settings window, type any Security Settings Name and choose Signing and Encryption Certificate.
- Select the appropriate certificate assigned in previous steps and leave the Algorithm Default and click OK.

- As soon as you select the information, you will notice that the Default Setting is populated with Security Settings Name.
- Click the Publish to GAL button.
- Publish this certificate to GAL, click OK.

6. Confirm that the Certificate is Published in Azure Active Directory (AAD):
- Connect to Exchange Online using remote PowerShell
- Run the following command and ensure that the UserSMimeCertificate attribute is populated with the certificate information. If not, return to Step 4.
Get-Mailbox <user> | FL or FT *user*

If you use Windows Certificate Authority, CA will publish the certificate information into the user object. In both the cases, you need to make use of DirSync tool to replicate the on-premises Active Directory information to the cloud. This will enable the cloud users to exchange S/MIME messages easily.
7. You can now use Outlook, OWA or EAS to send and receive S/MIME messages.
Please Note: Make sure you check S/MIME Supported Clients section below before exchanging S/MIME messages.
S/MIME Supported Clients –
All the client machines should have PKI issued user certificate installed under –
- Certificates – Current User
- Personal – Certificates
- Trusted Root Certification Authorities – Certificates
- Intermediate Certification Authorities – Certificates
If PKI issued certificate is unavailable, users will not be able to send digitally signed messages or decrypt S/MIME encrypted messages.
Outlook Web App:
- OWA for S/MIME: This is supported only on Windows Vista or greater with browser IE9 or above. IT does not support any other browser or on MOWA (Mobile for Outlook Web Access).
- Third Party certificates: They are not supported for OWA S/MIME. Only the Windows Certificate Authority issued certificates support this.
- To use Outlook Web Access with the S/MIME control, the client system on which the user is running Internet Explorer must have Outlook Web Access with the S/MIME control installed. S/MIME functionality in Outlook Web Access cannot be used on a system that does not have Outlook Web Access with the S/MIME control installed.
SMIME control in OWA requires .Net 4.5. All users accessing their mailboxes using OWA should install this on their machine. .Net 4.5 can be installed from Microsoft Downloads page.
Outlook
- Outlook 2010 and above are supported.
EAS Clients
- Windows phone 8.1 is a supported EAS client for S/MIME. To learn how to install a certificate on Windows Phone 8.1, see Installing digital certificates.
- For any other devices, you need to check with the device vendors.
Blog Source : https://blogs.technet.microsoft.com/exchange/2014/12/15/how-to-configure-smime-in-office-365/
About ISHIR:
ISHIR is a Dallas Fort Worth, Texas based AI-Native System Integrator and Digital Product Innovation Studio. ISHIR serves ambitious businesses across Texas through regional teams in Austin, Houston, and San Antonio, along with presence in Singapore and UAE (Abu Dhabi, Dubai) supported by an offshore delivery center in New Delhi and Noida, India, along with Global Capability Centers (GCC) across Asia including India (New Delhi, NOIDA), Nepal, Pakistan, Philippines, Sri Lanka, Vietnam, and UAE, Eastern Europe including Estonia, Kosovo, Latvia, Lithuania, Montenegro, Romania, and Ukraine, and LATAM including Argentina, Brazil, Chile, Colombia, Costa Rica, Mexico, and Peru.
ISHIR also recently launched Texas Venture Studio that embeds execution expertise and product leadership to help founders navigate early-stage challenges and build solutions that resonate with customers.
Get Started
Fill out the form below and we'll get back to you shortly.